
| Project | Seat |
| Piece | Club chair |
| Style | Art Deco |
| Technique | Both |
| Level | Advanced |
| Stages covered | Prepare · Covering · Finishing · Sewing |
| Covering & finishing | 17 h |
| Fabric | 5.5 m (6 yd), plain fabric 140 cm (54 in) wide, or basane leather |
| Trim | Piping, 6 m (6½ yd) |
| Decorative nails | About 200, if finished with 16 mm nails |
The club chair is one of the most loved armchairs, and one of the most demanding to cover well. Deep seat, rounded arms, generous volumes: every panel has to follow the curves without pulling or puckering. This project follows a real Art Deco club chair in my workshop, from stripping the old cover to sewing the new seat cushion, step by step.
This is a covering project. On this chair, the padding and structure were in good condition: the goal was simply to change the cover. Like many club chairs, it is built with several removable parts, which makes the work cleaner and easier if you take them apart in the right order. If your chair needs new springs or padding, start with Guide 2: Core Upholstery Techniques. To learn more about the chair itself, its history and its traditional leather, read What is a club chair?
On this page: Materials · Tools · The covering sequence · FAQ
Materials and Supplies
How much fabric do you need for a club chair?
For a club chair, plan 5.5 m (6 yd) of plain fabric 140 cm (54 in) wide. Add more for a large pattern repeat, a directional velvet, or piping cut from the same fabric, and always order the full quantity from the same dye lot. Check your own chair with the fabric calculator, and choose your fabric with the upholstery fabric guide.
- Covering fabric: 5.5 m (6 yd), 140 cm (54 in) wide, or basane leather
- Piping cord: 6 m (6½ yd)
- Staples and tacks: 6 to 10 mm
- Thread, cardboard strip for back tacking eventually
Tools
- Ripping chisel, mallet and tack lifter, for stripping
- Screwdriver, to remove the legs and the removable parts
- Staple gun, ideally pneumatic
- Upholstery scissors, pins and a curved needle, tape measure
- Pencil or marker pen for fabric; on leather, a ballpoint pen on the wrong side
Not sure what a tool is called? See the complete tools guide and the upholstery glossary.
The Covering Sequence, Step by Step
On a club chair, the order matters as much as the technique: each panel hides the fixings of the one before. Here is the sequence I follow in the workshop. Each step has its own detailed video tutorial.
Step 0: Strip the old cover and dismantle the chair
Before anything new goes on, remove the old cover in reverse order and take off the removable parts and the legs. Keep the old panels: they are your templates, and they show you exactly how the chair was built.
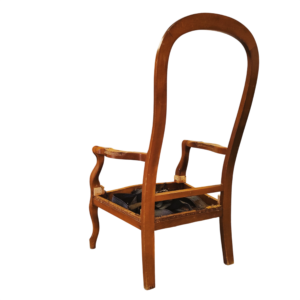
Preparing a Chair Frame for Upholstery: Stripping, Repairing and Finishing the Wood
Step 1: Cut the cover and make the piping
Before covering, I cut everything in one go: every panel of the cover and the piping strips at the same time. Laying out all the pieces together lets you place the pattern and the grain where they matter, and avoids running short of fabric at the end. Using the old panels as templates, mark each piece (on leather, with a ballpoint pen on the wrong side), cut, then make the piping right away so it is ready when the arms and the back go on. See how to make upholstery piping step by step and how to cut the fabric.
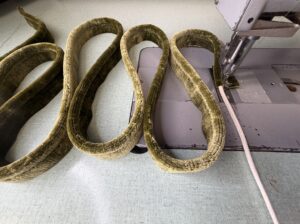
How to make upholstery piping, step by step
Step 2: Cover the seat front
The seat front is the first panel to go on, and it sets the reference line for everything that follows: if it isn’t straight and centred, every other panel will show it.
Watch the seat front tutorial · Hammer Club members
Step 3: Cover the arms
The thick, rounded arms are the signature of a club chair, and the hardest part to cover cleanly. The fabric has to wrap around a full curve without puckering, and both arms must end up identical.
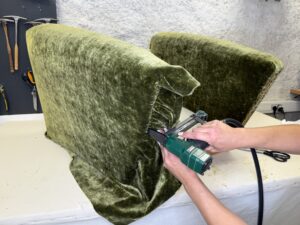
How to cover the arms of a club chair
Step 4: Cover the inside back
The inside back is the largest panel you see when you sit down. It has to follow the curve of the back with the grain perfectly straight, and fit tightly against the arms.
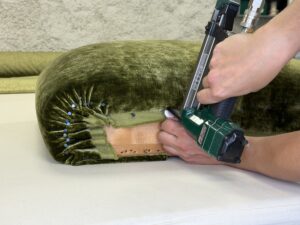
How to cover the inside back of a Club chair
Step 5: Cover the outside back
The outside back closes the chair and hides all the fixings of the previous panels. It goes on with no visible fixing, closed by hand with top stitching.
Step 6: Cover and fix the front arm panels
The front arm panels finish the front of the arms and frame the whole chair. They are covered separately, then fixed back in place: the precision of their outline shows immediately.
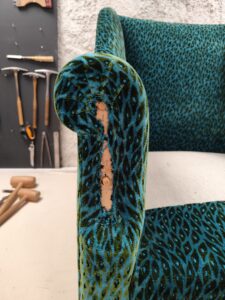
How to attach the wooden front of an arm (like club chairs)
Step 7: Fit the bottom cloth
The bottom cloth closes the underside of the chair, hides the last fixings and keeps the dust out. See also the general dustcover tutorial.
Step 8: Refit the legs
The legs go back on once the bottom cloth is in place. Only the seat cushion is left.
Step 9: Make the seat cushion
The loose seat cushion is the last piece. If the old cushion cover is in good condition, unpick it and use its pieces as patterns for the new cover. If it is missing, distorted or no longer fits, take a new template from the seat instead: see how to make a perfect seat cushion pattern. Then sew the new boxed cushion, with its piping: see how to sew a boxed cushion.
Club Chair Covering: Frequently Asked Questions
Can I change the cover of a club chair without redoing the padding?
Yes, if the padding and the structure are still in good condition, as on the chair in this tutorial. Press the seat, back and arms firmly: if they hold their shape and feel even, a new covering is enough. If the seat sags or the padding feels lumpy, it needs to be redone first.
Is a club chair a good project for a beginner?
Not as a first project. The volumes and curves make the covering demanding. Start with a simpler piece from Guide 1, then come back to the club chair once you are comfortable with fabric tension and corners.
Which fabric works best on a club chair?
A club chair calls for generous, sturdy materials with a minimum abrasion resistance of 30,000 Martindale rubs. My favourites: bouclé and other thick textured weaves, chenille, all kinds of velvet (wool velvet such as mohair for its depth, cotton or viscose velvet for softness), and wool fabrics, tartan included. The upholstery fabric guide explains how to read a fabric’s Martindale rating.
What about a leather club chair?
Traditionally, club chairs were covered in basane, a supple sheepskin leather. Leather is not worked like fabric: it has no straight grain or selvedge to guide you, it comes in hides of limited size, and every mark stays visible, so all the marking is done with a ballpoint pen on the wrong side. Traditionally, basane is worked wet: soaked with a sponge, then stretched and shaped around the curves while damp, fixed, and left to dry for about two days. See the full method in Making a leather club chair.
Keep Going
Discover everything about the club chair, a leather club chair covered in basane, all the covering tutorials and finishing tutorials, and every complete project in Guide 3. Prefer to learn it with me? You can bring your own chair to a 2-day class.