
If you’re looking for the perfect first upholstery project, this is it. A dining chair or side chair with a drop-in or fixed seat is the most accessible upholstery project there is. No complex frame, no tricky angles, no elaborate finishing techniques. Just a seat, some padding, a piece of fabric, and a satisfying result you can achieve in an afternoon.
This page walks you through every option depending on what your chair actually needs, from a simple re-cover to a full new seat with foam and webbing.
Step one: assess your chair before you do anything
Before you strip or cut anything, take a good look at the seat. Is the padding still in decent shape, or has it completely collapsed? Is the webbing underneath still providing support, or does it sag when you press it? Is the fabric the only thing that needs replacing, or does the whole seat need rebuilding from scratch?
Your answer to these questions determines which path to follow. The tutorials below are organised so you can go straight to what your chair actually needs.
What does your chair need?
- The padding is flat or collapsed: you need a full new seat with foam or natural fibers.
- The padding is still OK but the fabric is worn: you just need a re-cover.
- The seat sags when you sit on it: the webbing needs replacing before anything else.
The webbing: your foundation
If your seat sags or the base feels soft and unsupportive, start here. Good webbing is the foundation of any seat, and there’s no point building a new foam pad on a collapsed base. Elastic webbing is the simplest and most practical option for this type of chair.
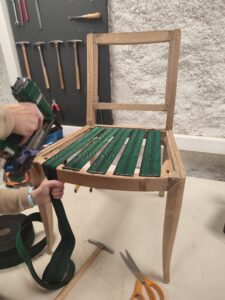
How to web with elastic webbing
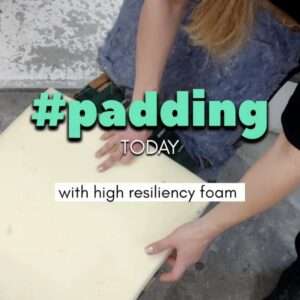
The padding: two options
Once your webbing is in place, or if the webbing is still solid and you just need new foam, here are your two options depending on how much height and cushioning you want.
Option 1: thin foam, low profile seat
This is the right approach for a chair where you want a neat, low-profile seat. A thinner foam layer gives a cleaner result on chairs with a shallow seat frame, and it’s the easiest version to cover neatly. Follow the complete tutorial below, which takes you from bare frame to finished seat in one go.
How to upholster a modern chair seat with foam easily

How to reupholster a dining chair seat for beginners (drop-in seat)
Option 2: thick foam with an edge roll, generous seat
If you want a more generous, well-rounded seat, a thicker foam with an edge roll gives a much more polished result. The edge roll defines the shape of the seat and prevents the foam from collapsing at the edges over time. It takes a little more work but the finish is noticeably better, especially on a chair that will be used daily.

Foam seat with edge roll tutorial
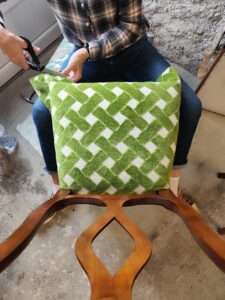
Covering the seat
Once your padding is in place, it’s time to cover. This is the most satisfying part, and on a simple chair seat, it goes quickly. The two things to get right are tension, your fabric needs to be pulled evenly on all sides before you staple, and the corners. A neat pleat on a squared corner makes the difference between a professional finish and one that looks rushed.
For the corners specifically, this tutorial shows you exactly how to create a clean, flat pleat on a squared edge seat:
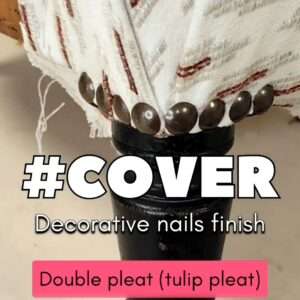
How to create a V pleat (tulip pleat) ending with decorative nails
How to create a simple pleat on a squared edge seat

How to create a v pleat (under a frame)
For the full covering process on a thin foam seat, start to finish:
Want to go further?
Once you’ve done a simple chair seat, you’ll have the core skills to move on to a full upholstery project. The bridge chair is a natural next step: a little more surface, the same logic, and a result that’s even more rewarding. You can also work through three complete beginner projects in the upholstery beginners guide.
All the tutorials on this page are available in full through the online membership, with video and step-by-step photos for every stage.
Prefer to learn in person? Try the french upholstery classes in Annecy. It’s a great way to get the foundations right from the start.