
Before a single spring is sewn or a metre of fabric is cut, there is a stage that most tutorials skip or rush through in two paragraphs. It is the stage that determines whether the finished piece holds its shape for twenty years or starts to fail in two. Stripping and preparing a piece of furniture is not a chore you get through to reach the interesting part. It is the interesting part. And once you know what to look for, it becomes one of the most satisfying steps in the whole process.
Step 0 – Strip, Read and Prepare
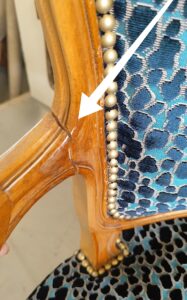
Easy trick to glue an arm junction on a cabriolet chair
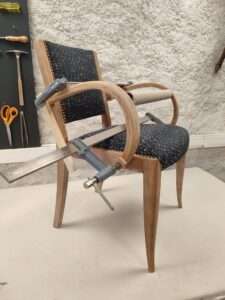
An easy pro tip to glue an press the wood with webbing
Fixing and gluing back the wood

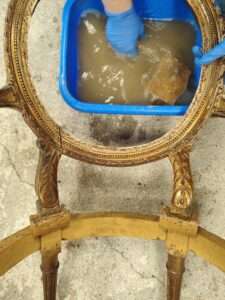
Security Tips for stripping
My magic products to make the wood new again
Every piece tells a story when you take it apart. The way it was built, the technique that was used, the decisions the original upholsterer made and the ones that went wrong. Learning to read a piece as you strip it is one of the most valuable skills in upholstery, and it is one that no amount of theory can replace. You develop it by doing it, carefully, on real pieces and by knowing what you are looking at when each layer comes off.
How to Strip Upholstery Properly
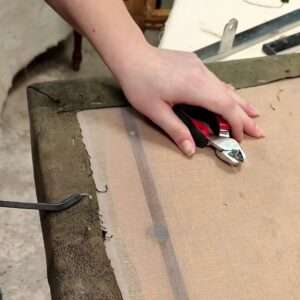
The rule is simple: you work backwards. The last thing that went on is the first thing that comes off. Every layer is removed carefully, kept intact where possible, and read before it is discarded. The old fabric is a cutting template. The original tack and staple positions mark the tension lines that worked. The condition of the webbing, the springs and the burlap tells you exactly what the seat needed and whether it got it. Strip fast and you lose all of that information. Strip carefully and the piece practically tells you how to rebuild it.
What You Find Underneath
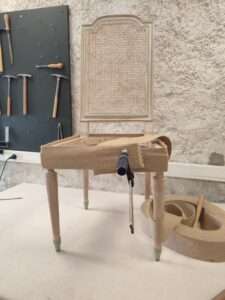
Once the upholstery is off and the bare frame is in front of you sometimes exposed for the first time in fifty years: the real assessment begins. This is where preparation becomes a discipline of its own. A frame that looks fine from the outside can have loose joints, cracked rails, worn rebates, or wood so dry it will not hold a tack. A frame that looks rough can be perfectly sound. You cannot know until you look. And once you know, you have to deal with what you find, correctly, in the right order, before a single piece of new material goes on.
Here is what this stage can involve and what the tutorials inside the membership aim to cover:
- Stripping technique and sequencing: the right tools, the right order, and the habits that make the work faster and safer. Including how to remove staples cleanly without damaging the rail, and how to take apart a piece that has been previously badly reupholstered.
- Safety during demolition: simple, non-negotiable rules for working with ripping chisels, tack lifters and staple removers. The injuries that happen at this stage are entirely avoidable once you know what they are.
- Reading the frame and the original build: understanding what technique was used, what materials are inside, and what the right approach to rebuilding is. Not every chair is rebuilt the same way, and the original build is the best guide you have.
- Assessing joint condition: knowing the difference between a joint that is fine, one that needs monitoring, and one that must be repaired before anything else happens. A loose joint under fresh upholstery is a problem that only gets worse.
- Regluing and clamping joints: how to reglue frame assemblies correctly, which adhesives to use on which joints, and how to clamp a curved or awkward frame without a workshop full of specialist equipment. There are professional tricks for this that make the job significantly easier.
- Woodwork repairs: filling cracks, replacing broken corner blocks, consolidating split rails. The level of woodwork involved in upholstery preparation is often underestimated, and knowing where the line is between a repair you can do yourself and one that needs a cabinetmaker is genuinely useful knowledge.
- Cleaning the frame: removing decades of wax, polish, grease and grime before any new finish is applied. What you use depends entirely on the existing finish and the condition of the wood underneath it.
- Sanding: when to sand, how much, and with what grit. Over-sanding show wood on a period piece is a mistake that cannot be undone. Under-sanding means the new finish will not adhere properly. Knowing the difference is the whole game.
- Staining and tinting: evening out colour variations after repairs, correcting the tone of wood that has been exposed to light unevenly, or changing the finish entirely. The products you use, and the order you apply them in, determine whether the result looks restored or refinished — two very different things on a period piece.
- Varnish, wax and oil: choosing the right finish for the piece, the style, the wood and the level of protection needed. And applying it in a way that enhances rather than flattens the character of the wood.
- Touch-ups and retouching : dealing with scratches, worn patches and marks on show wood without stripping and refinishing the whole frame. A skill that saves enormous amounts of time on pieces where the woodwork is otherwise sound.
None of this is difficult once you know how. All of it is difficult , and slow, and occasionally destructive when you are working it out for the first time on a piece you care about. The tutorials below cover every step, on real pieces, with the kind of detail that only comes from doing this work professionally every day.
What Comes Next
The frame is clean, solid and ready. Now the build begins. Depending on your piece and your project, here is where to go next:
Tools, materials and suppliers: link
Webbing : the first structural step: link
Not sure where to start? Beginner-friendly projects: link
Ready to learn properly?
If you want a clear learning path, professional methods, and no guessing,
Membership is where it starts.
Is there any technique missing?
As a guest or a member, you have the privilege of suggesting future tutorials in the comments below. If there is a technique or chair style missing from the platform, leave your request here, your idea could inspire the next tutorial release.