
Upholstery Springs: Support, Bounce and Structure
Springs are what separates a truly comfortable seat from one that merely looks the part. They absorb weight, distribute pressure evenly, and give a chair that unmistakable depth and resilience that no amount of padding alone can replicate. When they are done right, you don’t notice them. When they are wrong, you feel it every time you sit down.
This page covers traditional hand-tied double cone coil springs and links to the full step-by-step tutorials inside the membership. Zig-zag sinuous spring tutorials are coming soon.
Springs always sit on top of a webbed frame. If you have not done your webbing yet, start there first: it is the foundation everything else depends on.
Webbing techniques: link
What Tools and Materials Do You Need?
Before you start, make sure you have the right materials and tools on your bench. Working with coil springs requires a specific set — different from webbing, different from padding.
Springs: Upholstery materials
Materials
- Double cone coil springs in the right gauge and height for your frame. 9 gauge for seats, 10 or 12 gauge for backs and arms.
- Spring twine: natural is better but you can also use synthetic twine for tying.
- Jute burlap / hessian: to cover the spring deck once tied, before any padding is added.
- 14 mm tacks to secure the twine to the frame at both ends of each row.
Tools
- Upholstery hammer for driving tacks into the frame.
- Large curved needle for hand-sewing springs to the webbing and to the burlap.
- Scissors or cutting pliers for trimming twine cleanly.
- A staple gun: optional, for fixing the burlap over the spring deck.
Three Springing Techniques: Which One Do You Need?
Not all chairs are sprung the same way. The technique you use depends on the type of piece you are working on, its depth, and the level of comfort you want to achieve. Here is a clear overview of the three main approaches.
Technique 1 — Simple Springing
For salon chairs, bridge chairs and bergère armchairs
This is the most accessible springing technique and the right starting point for most beginners. It is used on chairs with a shallow seat depth — small salon chairs, bridge chairs, dining armchairs — as well as on bergère-style armchairs where the seat build is not too deep.
The springs are positioned on the webbing, hand-sewn in place, and tied with twine in a single direction. The sequence is straightforward, the number of springs is limited, and the result is a firm, well-supported seat that will last for years. Once you have done this technique once, the logic of all other spring methods becomes much clearer.

Simple springing technique
Technique 2 — Full Two-Way Hand-Tied Springing
For fully sprung armchairs and traditional sofas
This is the standard technique for deep armchairs, Voltaire chairs, Chesterfields, and any piece of traditional furniture with a full spring seat. It takes more time and more skill than the simple method but the result is in another category entirely: a spring deck that moves evenly in all directions, holds its shape for decades, and gives that unmistakable depth that no modern system can replicate.
The process unfolds in four clear stages:
Step 1 — Positioning
Springs are placed on the webbing in a specific grid pattern. Their number, spacing and orientation all affect the balance and feel of the finished seat. Getting this right before sewing anything is essential.

Springs positioning tutorial
Step 2 — Sewing onto the Webbing
Each spring is hand-sewn to the webbing at three or four points around its base. This anchors every spring individually, prevents lateral movement, and ensures nothing shifts when the seat is under load.

Sewing springs on the webbing
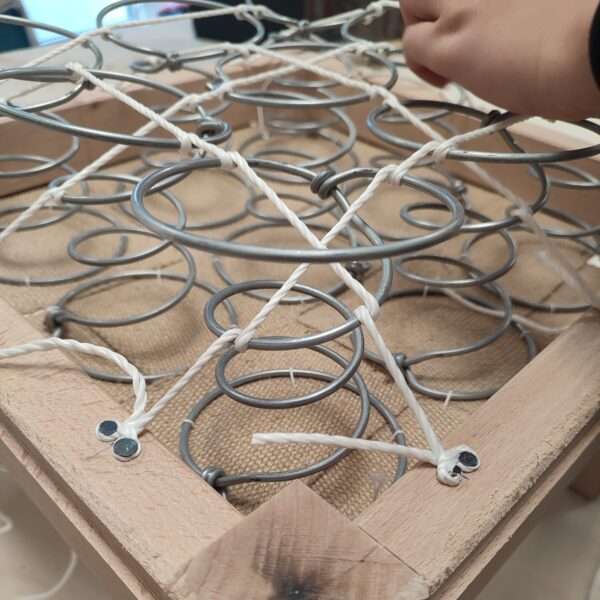
Step 3 — Tying: The Two-Way Method
Lashing twine is run in two crossing directions across the entire spring deck, tying each spring down to the same compressed height. This is the most technical step — the knots, the tension and the sequence all matter. Done correctly, it creates a perfectly level, balanced foundation ready for padding.

Springing: How to tie coil springs (two way method) on a armchair
Step 4 — Covering with Burlap and Sewing
A layer of heavy jute burlap is stretched and tacked over the spring deck. Each spring is then sewn to the burlap from above, locking the top of every spring in place. This is the final step of the springing process — once it is done, the seat is ready for padding.

Sewing springs on the hessian
Technique 3 – Spring Units (coming soon)
For contemporary furniture and industrial restoration
Spring units are pre-assembled systems – a grid of coil springs already linked together on a wire frame -that drop directly into a seat as a single piece. They are the approach used in most modern and semi-industrial furniture production, and a practical solution when restoring a contemporary sofa or armchair where the original unit has failed.
They require no hand-tying and no individual sewing onto webbing. The unit is positioned, secured to the frame, covered with burlap, and the seat is ready for padding. Faster to install, consistent in result, and well suited to the right project.
Step-by-step tutorials on spring units are coming soon inside the membership.
What Comes Next?
Your springs are tied and level, the seat structure is now complete. It is time to build the shape and comfort on top of it.
→ Padding
Traditional horsehair, vegetable fibre, cotton felt, or modern foam — padding is where the seat takes its final shape, layer by layer.
→ Covering & Finishing
Once the padding is right, the fabric goes on — cuts, pleats, piping, trim. This is where the whole project comes together into a finished piece.
All of these techniques and many more are available in full detail inside the membership. Every tutorial is here to show you the whole process, step by step, so you can follow along at your own pace, pause, rewind, and come back whenever you need a refresher.
Your Upholstery Journey in 3 clear guides
Start simple, learn the right techniques, then move to real projects. A clear method, built to last.