
Everything you need to restore a Voltaire armchair, from stripping the frame to the very last nail.
Here you will find absolutely every picture and video tutorial dedicated to the Voltaire armchair. Whether you are a total beginner or you have already tackled a few chairs, this is your complete step-by-step guide, from stripping the frame down to the very last decorative nail. Everything is organized in order so you can follow along without getting lost.
The Voltaire is one of the most classic French armchairs you will ever work on. It has a rounded back, padded arms, and a generous seat, which makes it a bit of a challenge but also incredibly satisfying to restore. Once you know the order of operations, it all makes sense. Let’s go through it together.
How much fabric or braid do you need for a Voltaire armchair?
Before you buy anything, here are the quantities you need to plan for a standard-size Voltaire. These numbers work for most adult-size chairs in good structural condition.
- Fabric: 2 meters at 140 cm wide is enough to cover the seat, back (inside and outside), and both arms. If your fabric has a large repeat pattern, add 50 cm to be safe.
- Decorative nails: You need around 800 nails in 11 mm. These usually come in boxes of 1000, which is perfect because you will always need a few spares when one goes crooked.
- Braid or double welting cord: If you prefer braid or gimp over nails, plan for 7 meters. This is enough to trim all the visible edges cleanly.
One practical tip: always buy your nails or braid at the same time as your fabric, so the finish matches perfectly. The colour of your nail heads or braid should either match the fabric exactly or contrast with it intentionally. There is no in-between that looks good.
Before You Start: Preparing the Frame
Skipping frame prep is the number one mistake people make with vintage chairs. If the wood is damaged, wobbly, or has old finish peeling off, no amount of beautiful fabric will save it. Take the time to strip it properly, repair any broken joints, and treat or paint the exposed wood before you put a single staple in.
The full tutorial below covers how to strip the old upholstery, reinforce weak joints, fill cracks, and decide whether to paint or wax the wood show parts of your Voltaire.
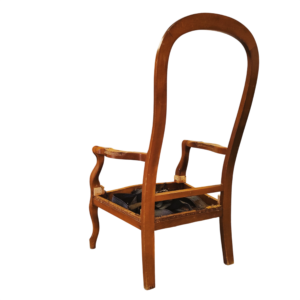
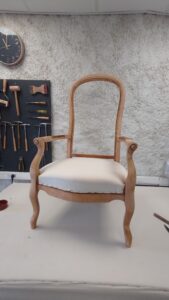
Preparing a Chair Frame for Upholstery: Stripping, Repairing and Finishing the Wood
Foam Upholstery Tutorials for the Voltaire Armchair
These tutorials use the modern foam method, which gives you a clean, consistent shape without the years of training that traditional horsehair upholstery requires. The secret is combining edge rolls with layered foam to recreate the soft, rounded profile that makes a Voltaire look so elegant. Each section of the chair is done separately, always in the same order: seat first, then back, then arms.
How to upholster the seat with foam
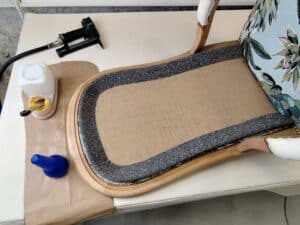
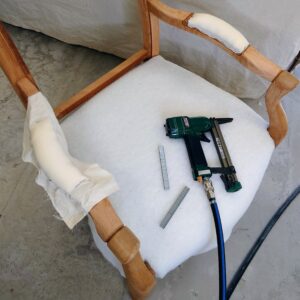
The seat of a Voltaire is wide and fairly flat at the top, but it needs to look full and rounded at the front edge. This tutorial shows you how to build that shape using edge rolls around the perimeter and two or three layers of foam stacked to create the right height and firmness. You will also learn how to bevel the foam edges so the fabric goes on without any lumps or ridges showing through.
Modern Foam Upholstery with a Traditional Shape: Voltaire Armchair SEAT Tutorial
How to upholster the back with foam
The inside back of a Voltaire needs to look full and gently rounded, not flat like a cushion glued to a board. This tutorial covers the inside back only, using edge rolls along the top and sides, plus two layers of foam to get that classic barrel shape. Pay close attention to how the foam is shaped around the upper corners: this is where most beginners lose the silhouette of the chair.
Modern Foam Upholstery : The back of a Voltaire Chair
How to upholster the arms with foam
Arms are often the part people dread most, but on a Voltaire they are actually quite forgiving once you understand the structure. This tutorial shows you the simplest and most reliable method: wrapping each arm pad cleanly so there are no puckers at the front post and no fabric pulling awkwardly at the back. No complicated cuts, no guessing. Just a clean result every time.
The easiest way to upholster arms with foam
Covering Tutorials: How to Put the Fabric On
Once your padding is done, it’s time for the fabric. This is the part that makes or breaks the whole project visually, so take your time. The covering tutorials are broken down section by section, in the order you should work: seat, then inside back with outside back, then arms last. Always cover in this order on a Voltaire, and never skip the pinning and checking step before you staple anything permanently.
How to cover the seat of a Voltaire armchair
Covering the seat means cutting your fabric on grain, centering any pattern, and pulling it tight enough to remove wrinkles without distorting the weave. The front corners of a Voltaire seat have a slight curve, so you will learn how to fold those corners neatly without a pleat showing from the front. Staple placement matters here: too close to the edge and the fabric bubbles, too far back and it pulls when someone sits down.
Covering the Seat of an Armchair (Voltaire)
How to cover the inside back of a Voltaire armchair
The inside back is the piece everyone will see first when they walk into the room, so precision counts. The fabric needs to follow the curve of the top rail smoothly, with the tuck at the bottom sitting deep enough that it will never pull out under normal use. This tutorial walks you through the cuts you need to make around the arm uprights, which is always the trickiest part on a Voltaire.
How to cover the outside back and finish the chair
The outside back is the last piece of fabric to go on, and it is also the one that gives the chair its finished, polished look from behind. It is attached differently from the inside: no staples showing, clean folded edges, and always lined with a dust cover at the bottom. Once this is done, all that’s left is your finishing choice: nails placed one by one along every seam, or a length of braid glued neatly into place. Either way, this final step is what transforms a recovered chair into something that looks properly done.
Take your time with the finish. A Voltaire that has been covered with care and trimmed with precision is a chair that will last another fifty years and make you proud every time you walk past it.
Not a member yet?
One membership gives you full access to every single video tutorial on the site.